|
After 5 months on the road, here's some bullet point words of wisdom for anybody traveling overseas!
Travel notes
0 Comments
Overlanding Central America is not as intimidating as guide books may have you believe. There are many options ranging in comfort, cost, and travel time. In this post we distill down your options to help you make easier decisions and avoid some of the pitfalls we found along the road.
Buses and shuttles Buses and shuttles are the most common mode of transportation and inexpensive but can take a very long time. Here are the typical options. 1. “Chicken buses” are retired US school buses painted with neat designs, chromed out, and full the brim with people, luggage, and sometimes chickens. These buses stop regularly so progress is slow but they are very cheap like $.50 USD per hour of travel. Fares are sometimes posted but if you get on or off mid route, are negotiable. There’s typically one person on the bus in charge of money who watches for folks getting on and then gives them a price for where they want to go. They may try to take advantage of you and charge much more than is reasonable to see what they can get away with. Watch how much the locals pay to not get taken to the cleaners. Folks may try to charge you extra for large bags or for random reasons like being tall. That’s a bunch of malarkey as long as your bag fits in the overhead rack or in your lap. The language barrier can be a challenge though so keep the overall cost in perspective and pick your battles. Don’t sweat a dollar or two because you’ll be on the bus with everyone for a while! 2. “Tica buses” are traditional tour buses with AC, reclining seats, and multiple stops. These buses range in quality, comfort, and reliability and are rather inexpensive overall but some routes can be oddly expensive. Try to avoid the back of the bus since the bathroom stinks worse after each hour of travel. If those are the only seats left as was always the case for us, there is sometimes a window in the bathroom that you can open up which helps tremendously. Bathroom doors tended to not close well so give it a good slam. Also, if it rains, the back of the bus has the highest chance of leaks in the ceiling. Overall, try to board the bus at its point of origin rather than jumping on halfway through a route for a chance at a better seat. 3. “Shuttles” are large 15 passenger vans that tend to make straight shot trips from one backpacker hub to another. These range in quality as well, some with AC and movies, and tend to be the fastest since they are usually straight-shot transportation with stops only for gas and food breaks. They are more expensive at about $5 USD per hour. They tend to have great movie selections as well! We used all three types but preferred shuttles since they were more reliable and quicker and we’ve got a lot of ground to cover with a short time to do it. Booking ground transportation Booking transportation is easy and can be done at the plethora of travel agencies in towns or through the front desks at hostels. You don’t have to stay at a hostel to book transportation through them. Generally, there are only a few companies with the vehicles while the hostels and travel agencies act as the middle men to consolidate travelers onto the same shuttle, and they get a small kickback for bringing in the traveler. Sometimes you can book directly with the shuttle company for cheaper and some companies offer discounts to repeat travelers (10% discount). Be sure to ask whether you’ll have to switch vehicles or drivers along the route. Switching vehicles can add many hours to your travel time because it means you will get dumped off in a random town probably in the opposite direction from where you want to go where you’ll have to hope the next shuttle comes through to pick you up. One of our hostels did this to us and a 7 hour trip became 15 hours. If you’re going off the beaten path, this maneuver becomes more common unless you are traveling with a big enough group (4+ people) to warrant hiring a dedicated van. Regardless of vehicle, we learned the hard way that you are at the mercy of the state of roads, fickle traffic, and inefficient borders. We learned to double the estimated travel time that Google Maps gives you. Guatemala was particularly difficult because there are just not many roads so you only have a couple routes between regions. They have trouble with landslides and erosion in the mountains and I heard one route was no longer safe to travel due to highway robberies. Some roads were so bumpy that our fitbit registered the potholes as steps! Land border crossings can take 15 minutes or 4 hours. It helps to have a knowledgeable driver to get you to the right people and tell you what to expect. In Nicaragua for instance, we had to have our temperature taken, the bus sprayed down with a mystery chemical, and money exchanged with some shady guys with fanny packs. Our driver made the process much smoother than it could’ve been. Also, expect long delays for random security checkpoints and expect your driver to be pulled over for miscellaneous “fines” which happened twice on different trips for us. While on the shuttle, your butt and back will hurt. We found these handy therma-rest style foam pads to sit on which help some. It’s also rather difficult to sleep since the roads are windy and many vehicles have choppy manual transmissions. Regardless of what you try, you’ll likely need some recovery time the next day to get your legs and head back to normal. Our two best shuttle rides were with a company called Roneey. They were very fast to respond online and through Whatsapp and by far the most efficient transportation service. They wave at all the police, border agents, and friends in the towns they go through which I could tell greased the wheels a bit for how smoothly we were able to travel across countries. Flights Flights can be quite expensive in Central America. It seems like a few budget airlines dominate certain cities and routes which makes flights reasonable in cost and simplicity whereas other origin or destination points can be three times more expensive with many transfers and long layovers. Flights can save you days of bus travel and come out to a similar cost to a multi-leg vehicle trip with overnight lodging in towns along the road. They’re worth considering but require you to be flexible with origin, destination, and dates. Flights can also be a welcome, well-deserved respite from brutal bus rides. Uber/Taxi Ubers are very rare in Central America. The only city we found any was in San Jose, Costa Rica and they were cheap, reliable, and had nice cars. Overall, the cities in Central America are small so there’s not much need for ubers or taxis. Spanish urban planning was consistent in Central America’s colonial towns so you have consistent grid formats from city to city making navigation easier as well. You don’t have the same suburban sprawl as in many US cities so urban areas are dense with places to stay, eat, and be entertained. Taxis are useful when you get caught in a flash thunderstorm but prices can be all over the place. Try to get the price before setting off in the taxi otherwise you’re at the mercy of whatever the driver thinks of you since few taxis seemed to have meters. In general, it’s not as bad as online forums and hotels lead you to believe. Good ol’ fashioned walking We felt safe walking around the streets of all the Central American towns we visited. Like in the US, be conscientious of your surroundings and don’t go down dark alleys at night. You can’t text and walk in colonial towns because you will fall in a hole. Sidewalks are a patchwork of driveways, steps, and wooden planks and the mysterious holes leading to the sewer can be ankle or even waist deep. Also, signs for street names are rare. We relied heavily on Google Maps and zen navigation. Asking for directions was only somewhat successful because, particularly in Costa Rica, folks don’t want to seem like they don’t know so they sometimes make up an answer and send you on a wild goose chase. When in doubt, ask a couple of people and compare those directions. Lastly, the plentiful stray dogs seemed quite nice and somebody must watch out for them. They’re good at begging and play the poor puppy dog card well. They were even picky about the treats you snuck them!
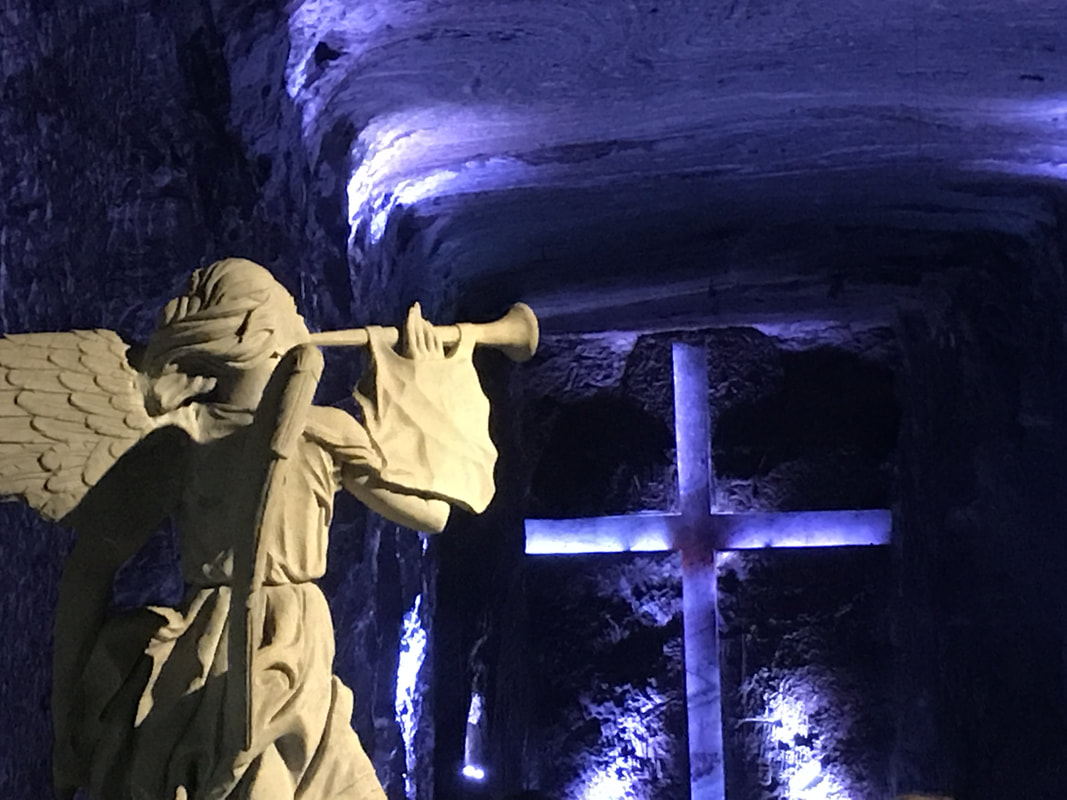
The Catedral de Sal is an underground Roman Catholic church built within the tunnels of a salt mine 200 meters underground. It’s an hour or two outside the city of Bogotá in Cundinamarca, Colombia which is near the town of Zipaquirá, Colombia.
How to get to Catedral de Sal from Bogotá without paying for a tour from the city: Step 1: get to the Portal Norte bus station. There are a lot of buses leading here no matter what part of the city you’re leaving from, or of course you can Uber / taxi there. If you take the bus, it will cost you 3,000 Colombian pesos (about $1 US) to buy a card, and then 2,200 Colombian pesos (less than $1 US) for each ride on the bus. Once you have a card, you can hold on to that, and you don’t need to buy another. Step 2: Get a bus to Zipaquirá. Once you’re at Portal Norte bus station, cross to the other side of the platform (there’s a passage under the road that you can take to the other side). Look for the signs for Zipaquirá, and board the bus. You pay for a ticket once you are already on the bus, and it’s 5,100 Colombian pesos per person (less than $2 US). This bus has comfy seats, so it’s not a bad ride. Step 3: Tell the bus driver that you want to stop at Zipaquirá / Catedral de Sal ("Voy (singular) / Vamos (plural) al Catedral de Sal."). He / She will let you know when it’s time to get off. They drop you off at what seems like a random corner located here: Step 4: Walk to the cathedral (or taxi). It’s about a 30 minute walk (1.2 miles), and there are a bunch of little shops you can look at along the way. When you get to the yellow entrance gate follow the white line up the steps. Step 5: Buy a ticket. It’s 50,000 Colombian pesos ($17 US) for an English guide of the cathedral. There are other options if you speak Spanish that include a little bit more, but only the one option for English speakers. Getting back to Bogotá: Reverse, reverse! You will catch the bus going back to Bogotá from directly across the street of the place you got dropped off coming from Bogotá. From there, you just reverse what you did to get to the cathedral. 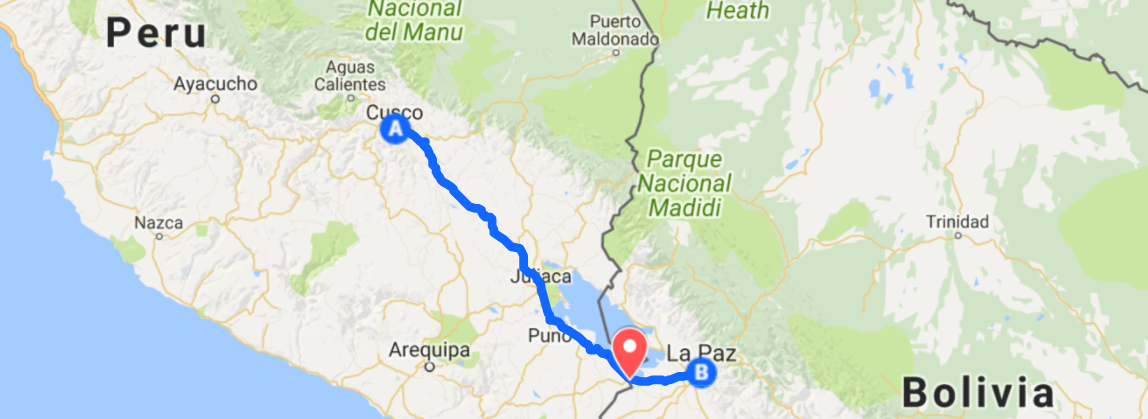 Written by: Sara
I’ve crossed several borders in my time – a lot by air, but a lot by bus as well. This was the most difficult border that I’ve crossed. We could have been more prepared, but there wasn’t a lot of information telling us what to expect. We had also heard from friends that you did not need a visa in advance for Bolivia as a U.S. citizen. And it’s true – you don’t. We just proved that. But you do need more than just you and your passport. Here was our experience, and hopefully it will help you avoid the same mistakes... We took an overnight bus with Continente Internacional from Cusco, Peru to La Paz, Bolivia. The seats reclined partially, and they were pretty comfortable. I was able to get some sleep in, and it was kind of cozy with the blankets they provided us. The bus left Cusco at 10:15 PM, and arrived at the Peru-Bolivia border crossing (in Desaguadero) at 8 AM. Once you get to Desaguadero, you first need to get your exit stamp from Peru. This part is straight forward – you stand in line, they stamp your passport and the little piece of paper you’ve been carrying with you all through Peru, and you leave the building. One thing I found odd here though is that the immigration officer had to look at me and my passport a couple of times before agreeing that it was me. I’ve grown my hair out from a pixie to chin length, and apparently that’s the first time he’s ever seen a change in hairstyles before. After you’ve exited Peru, you cross the border into Bolivia on foot. To get a visa upon arrival in the immigration office here, you need:
Colin was smart enough to print off a copy of his bank statement, our hostel reservation, and our bus tickets out to Chile, but we only had one copy of each and did not have copies of our passports or proof of yellow fever vaccination. We are traveling with several little standard visa photos, so we had those as well. Colin only printed off his bank statement, so we made a copy of that for me and a copy of our marriage certificate in hope that it would be good enough (and it was, although I’m not sure they looked closely enough at the name on the statement to notice that it was only his). When we got to the Bolivia immigration office, we had to turn around and go back through to Peru to make the rest of the copies that we needed because there were no photocopiers that were working on the Bolivian side. Luckily, we hadn’t changed over our money yet, so we still had some Peruvian soles to pay with. All of this takes about 30 minutes, so we are back at the Bolivian immigration office at 8:30 AM and we wait in line for about an hour until we finally reach the front of the line. The immigration officer takes all of our paperwork and kind of laughs and says that they don’t issue visas here (this was all translated to us by a nice man next to us because she spoke literally zero English). She continued to laugh and flip through our paperwork to see what all we have, and smiled when she sees our marriage certificate. She started rushing around the little office looking for something, and then came back and told us that we couldn’t get a visa there because we didn’t have the visa application. Well, actually, Colin had filled out the visa application for himself, so he had a copy. He’d tried to do mine as well, but their website stopped working. For whatever reason, now that Colin had an application, everything was okay. The immigration office had one copy of the visa application. ONE copy. So, I had to run back to Peru to make a photocopy for myself and fill that out. Luckily, I still had a few coins to get copies with because we’d already exchanged the rest of the money thinking that we were done with the Peruvian side. Once all that was done, there was a guy who issued us the visas for $160 each (in US money). He looked over each $20 bill that we handed him and wouldn’t take any that were even the tiniest bit torn. Then, we needed to go back to the lady for her to give us an entry stamp. AND THEN you need to make a photocopy of your newly issued visa and your entry stamp for them to keep with your other paperwork. At this point, we’d run out of Peruvian money, and the bus driver was following us around since we were holding up the bus from leaving. The bus driver was extremely helpful because he not only held the bus from leaving us, but when I told him we had no more Peruvian soles, he told us to go back to the bus, and he ran to get the needed photocopies for the immigration office. We arrived in La Paz at 2 PM... We were expected to arrive at 11 AM, so even with Colin and I taking an hour longer at the border than we were supposed to (oops), we still got in later than scheduled.` I’m still not convinced everything was done 100% correctly, so I’m just waiting until we try to exit and find out that we entered the country illegally. We shall see…… |
Sara & ColinWe are figuring out our travel as we go along, and we'd love to help you out with yours! If you want to read more of our travel thoughts, check out each of our personal blogs by clicking the images below. Archives
August 2017
Categories
All
|
McPatton Manual - DNU

 RSS Feed
