|
After 5 months on the road, here's some bullet point words of wisdom for anybody traveling overseas!
Travel notes
0 Comments
Overlanding Central America is not as intimidating as guide books may have you believe. There are many options ranging in comfort, cost, and travel time. In this post we distill down your options to help you make easier decisions and avoid some of the pitfalls we found along the road.
Buses and shuttles Buses and shuttles are the most common mode of transportation and inexpensive but can take a very long time. Here are the typical options. 1. “Chicken buses” are retired US school buses painted with neat designs, chromed out, and full the brim with people, luggage, and sometimes chickens. These buses stop regularly so progress is slow but they are very cheap like $.50 USD per hour of travel. Fares are sometimes posted but if you get on or off mid route, are negotiable. There’s typically one person on the bus in charge of money who watches for folks getting on and then gives them a price for where they want to go. They may try to take advantage of you and charge much more than is reasonable to see what they can get away with. Watch how much the locals pay to not get taken to the cleaners. Folks may try to charge you extra for large bags or for random reasons like being tall. That’s a bunch of malarkey as long as your bag fits in the overhead rack or in your lap. The language barrier can be a challenge though so keep the overall cost in perspective and pick your battles. Don’t sweat a dollar or two because you’ll be on the bus with everyone for a while! 2. “Tica buses” are traditional tour buses with AC, reclining seats, and multiple stops. These buses range in quality, comfort, and reliability and are rather inexpensive overall but some routes can be oddly expensive. Try to avoid the back of the bus since the bathroom stinks worse after each hour of travel. If those are the only seats left as was always the case for us, there is sometimes a window in the bathroom that you can open up which helps tremendously. Bathroom doors tended to not close well so give it a good slam. Also, if it rains, the back of the bus has the highest chance of leaks in the ceiling. Overall, try to board the bus at its point of origin rather than jumping on halfway through a route for a chance at a better seat. 3. “Shuttles” are large 15 passenger vans that tend to make straight shot trips from one backpacker hub to another. These range in quality as well, some with AC and movies, and tend to be the fastest since they are usually straight-shot transportation with stops only for gas and food breaks. They are more expensive at about $5 USD per hour. They tend to have great movie selections as well! We used all three types but preferred shuttles since they were more reliable and quicker and we’ve got a lot of ground to cover with a short time to do it. Booking ground transportation Booking transportation is easy and can be done at the plethora of travel agencies in towns or through the front desks at hostels. You don’t have to stay at a hostel to book transportation through them. Generally, there are only a few companies with the vehicles while the hostels and travel agencies act as the middle men to consolidate travelers onto the same shuttle, and they get a small kickback for bringing in the traveler. Sometimes you can book directly with the shuttle company for cheaper and some companies offer discounts to repeat travelers (10% discount). Be sure to ask whether you’ll have to switch vehicles or drivers along the route. Switching vehicles can add many hours to your travel time because it means you will get dumped off in a random town probably in the opposite direction from where you want to go where you’ll have to hope the next shuttle comes through to pick you up. One of our hostels did this to us and a 7 hour trip became 15 hours. If you’re going off the beaten path, this maneuver becomes more common unless you are traveling with a big enough group (4+ people) to warrant hiring a dedicated van. Regardless of vehicle, we learned the hard way that you are at the mercy of the state of roads, fickle traffic, and inefficient borders. We learned to double the estimated travel time that Google Maps gives you. Guatemala was particularly difficult because there are just not many roads so you only have a couple routes between regions. They have trouble with landslides and erosion in the mountains and I heard one route was no longer safe to travel due to highway robberies. Some roads were so bumpy that our fitbit registered the potholes as steps! Land border crossings can take 15 minutes or 4 hours. It helps to have a knowledgeable driver to get you to the right people and tell you what to expect. In Nicaragua for instance, we had to have our temperature taken, the bus sprayed down with a mystery chemical, and money exchanged with some shady guys with fanny packs. Our driver made the process much smoother than it could’ve been. Also, expect long delays for random security checkpoints and expect your driver to be pulled over for miscellaneous “fines” which happened twice on different trips for us. While on the shuttle, your butt and back will hurt. We found these handy therma-rest style foam pads to sit on which help some. It’s also rather difficult to sleep since the roads are windy and many vehicles have choppy manual transmissions. Regardless of what you try, you’ll likely need some recovery time the next day to get your legs and head back to normal. Our two best shuttle rides were with a company called Roneey. They were very fast to respond online and through Whatsapp and by far the most efficient transportation service. They wave at all the police, border agents, and friends in the towns they go through which I could tell greased the wheels a bit for how smoothly we were able to travel across countries. Flights Flights can be quite expensive in Central America. It seems like a few budget airlines dominate certain cities and routes which makes flights reasonable in cost and simplicity whereas other origin or destination points can be three times more expensive with many transfers and long layovers. Flights can save you days of bus travel and come out to a similar cost to a multi-leg vehicle trip with overnight lodging in towns along the road. They’re worth considering but require you to be flexible with origin, destination, and dates. Flights can also be a welcome, well-deserved respite from brutal bus rides. Uber/Taxi Ubers are very rare in Central America. The only city we found any was in San Jose, Costa Rica and they were cheap, reliable, and had nice cars. Overall, the cities in Central America are small so there’s not much need for ubers or taxis. Spanish urban planning was consistent in Central America’s colonial towns so you have consistent grid formats from city to city making navigation easier as well. You don’t have the same suburban sprawl as in many US cities so urban areas are dense with places to stay, eat, and be entertained. Taxis are useful when you get caught in a flash thunderstorm but prices can be all over the place. Try to get the price before setting off in the taxi otherwise you’re at the mercy of whatever the driver thinks of you since few taxis seemed to have meters. In general, it’s not as bad as online forums and hotels lead you to believe. Good ol’ fashioned walking We felt safe walking around the streets of all the Central American towns we visited. Like in the US, be conscientious of your surroundings and don’t go down dark alleys at night. You can’t text and walk in colonial towns because you will fall in a hole. Sidewalks are a patchwork of driveways, steps, and wooden planks and the mysterious holes leading to the sewer can be ankle or even waist deep. Also, signs for street names are rare. We relied heavily on Google Maps and zen navigation. Asking for directions was only somewhat successful because, particularly in Costa Rica, folks don’t want to seem like they don’t know so they sometimes make up an answer and send you on a wild goose chase. When in doubt, ask a couple of people and compare those directions. Lastly, the plentiful stray dogs seemed quite nice and somebody must watch out for them. They’re good at begging and play the poor puppy dog card well. They were even picky about the treats you snuck them!
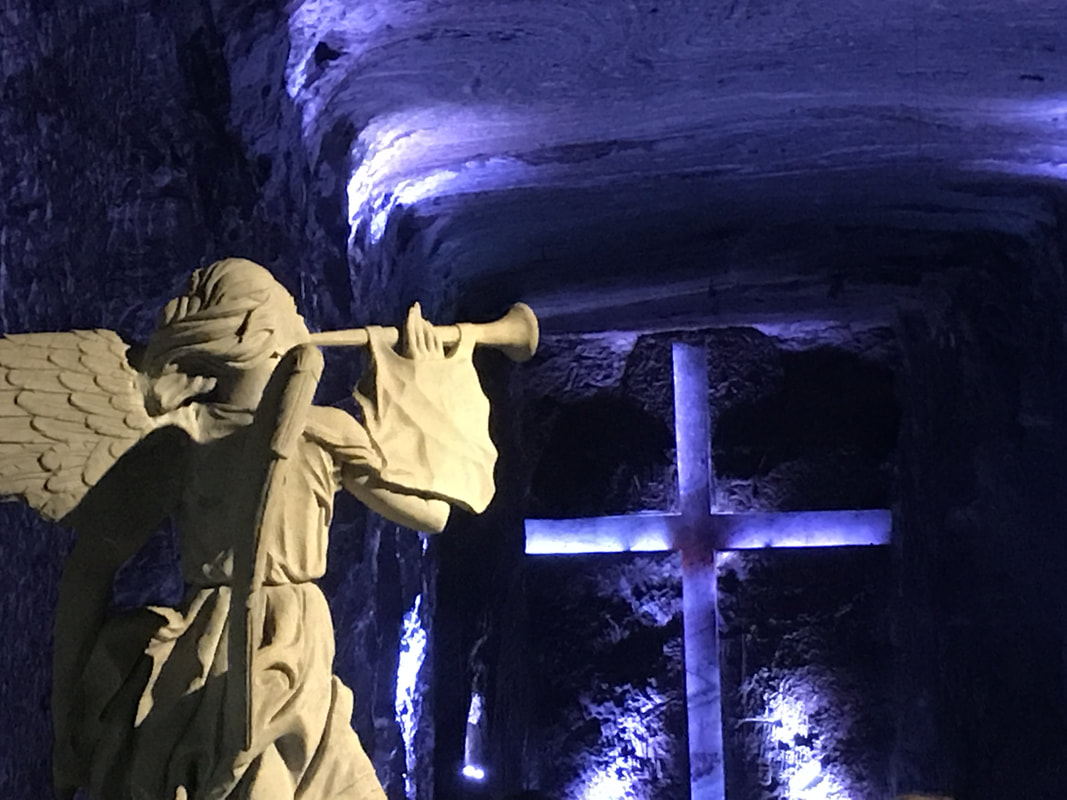
The Catedral de Sal is an underground Roman Catholic church built within the tunnels of a salt mine 200 meters underground. It’s an hour or two outside the city of Bogotá in Cundinamarca, Colombia which is near the town of Zipaquirá, Colombia.
How to get to Catedral de Sal from Bogotá without paying for a tour from the city: Step 1: get to the Portal Norte bus station. There are a lot of buses leading here no matter what part of the city you’re leaving from, or of course you can Uber / taxi there. If you take the bus, it will cost you 3,000 Colombian pesos (about $1 US) to buy a card, and then 2,200 Colombian pesos (less than $1 US) for each ride on the bus. Once you have a card, you can hold on to that, and you don’t need to buy another. Step 2: Get a bus to Zipaquirá. Once you’re at Portal Norte bus station, cross to the other side of the platform (there’s a passage under the road that you can take to the other side). Look for the signs for Zipaquirá, and board the bus. You pay for a ticket once you are already on the bus, and it’s 5,100 Colombian pesos per person (less than $2 US). This bus has comfy seats, so it’s not a bad ride. Step 3: Tell the bus driver that you want to stop at Zipaquirá / Catedral de Sal ("Voy (singular) / Vamos (plural) al Catedral de Sal."). He / She will let you know when it’s time to get off. They drop you off at what seems like a random corner located here: Step 4: Walk to the cathedral (or taxi). It’s about a 30 minute walk (1.2 miles), and there are a bunch of little shops you can look at along the way. When you get to the yellow entrance gate follow the white line up the steps. Step 5: Buy a ticket. It’s 50,000 Colombian pesos ($17 US) for an English guide of the cathedral. There are other options if you speak Spanish that include a little bit more, but only the one option for English speakers. Getting back to Bogotá: Reverse, reverse! You will catch the bus going back to Bogotá from directly across the street of the place you got dropped off coming from Bogotá. From there, you just reverse what you did to get to the cathedral. 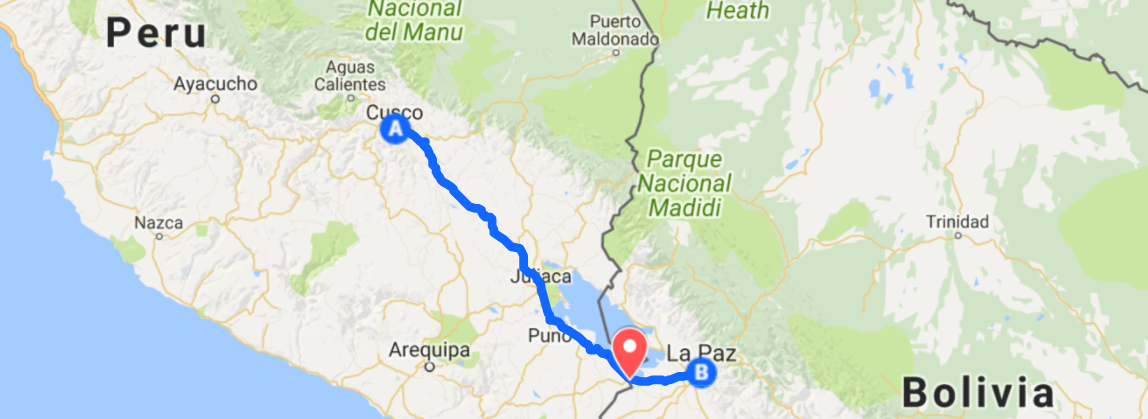 Written by: Sara
I’ve crossed several borders in my time – a lot by air, but a lot by bus as well. This was the most difficult border that I’ve crossed. We could have been more prepared, but there wasn’t a lot of information telling us what to expect. We had also heard from friends that you did not need a visa in advance for Bolivia as a U.S. citizen. And it’s true – you don’t. We just proved that. But you do need more than just you and your passport. Here was our experience, and hopefully it will help you avoid the same mistakes... We took an overnight bus with Continente Internacional from Cusco, Peru to La Paz, Bolivia. The seats reclined partially, and they were pretty comfortable. I was able to get some sleep in, and it was kind of cozy with the blankets they provided us. The bus left Cusco at 10:15 PM, and arrived at the Peru-Bolivia border crossing (in Desaguadero) at 8 AM. Once you get to Desaguadero, you first need to get your exit stamp from Peru. This part is straight forward – you stand in line, they stamp your passport and the little piece of paper you’ve been carrying with you all through Peru, and you leave the building. One thing I found odd here though is that the immigration officer had to look at me and my passport a couple of times before agreeing that it was me. I’ve grown my hair out from a pixie to chin length, and apparently that’s the first time he’s ever seen a change in hairstyles before. After you’ve exited Peru, you cross the border into Bolivia on foot. To get a visa upon arrival in the immigration office here, you need:
Colin was smart enough to print off a copy of his bank statement, our hostel reservation, and our bus tickets out to Chile, but we only had one copy of each and did not have copies of our passports or proof of yellow fever vaccination. We are traveling with several little standard visa photos, so we had those as well. Colin only printed off his bank statement, so we made a copy of that for me and a copy of our marriage certificate in hope that it would be good enough (and it was, although I’m not sure they looked closely enough at the name on the statement to notice that it was only his). When we got to the Bolivia immigration office, we had to turn around and go back through to Peru to make the rest of the copies that we needed because there were no photocopiers that were working on the Bolivian side. Luckily, we hadn’t changed over our money yet, so we still had some Peruvian soles to pay with. All of this takes about 30 minutes, so we are back at the Bolivian immigration office at 8:30 AM and we wait in line for about an hour until we finally reach the front of the line. The immigration officer takes all of our paperwork and kind of laughs and says that they don’t issue visas here (this was all translated to us by a nice man next to us because she spoke literally zero English). She continued to laugh and flip through our paperwork to see what all we have, and smiled when she sees our marriage certificate. She started rushing around the little office looking for something, and then came back and told us that we couldn’t get a visa there because we didn’t have the visa application. Well, actually, Colin had filled out the visa application for himself, so he had a copy. He’d tried to do mine as well, but their website stopped working. For whatever reason, now that Colin had an application, everything was okay. The immigration office had one copy of the visa application. ONE copy. So, I had to run back to Peru to make a photocopy for myself and fill that out. Luckily, I still had a few coins to get copies with because we’d already exchanged the rest of the money thinking that we were done with the Peruvian side. Once all that was done, there was a guy who issued us the visas for $160 each (in US money). He looked over each $20 bill that we handed him and wouldn’t take any that were even the tiniest bit torn. Then, we needed to go back to the lady for her to give us an entry stamp. AND THEN you need to make a photocopy of your newly issued visa and your entry stamp for them to keep with your other paperwork. At this point, we’d run out of Peruvian money, and the bus driver was following us around since we were holding up the bus from leaving. The bus driver was extremely helpful because he not only held the bus from leaving us, but when I told him we had no more Peruvian soles, he told us to go back to the bus, and he ran to get the needed photocopies for the immigration office. We arrived in La Paz at 2 PM... We were expected to arrive at 11 AM, so even with Colin and I taking an hour longer at the border than we were supposed to (oops), we still got in later than scheduled.` I’m still not convinced everything was done 100% correctly, so I’m just waiting until we try to exit and find out that we entered the country illegally. We shall see…… 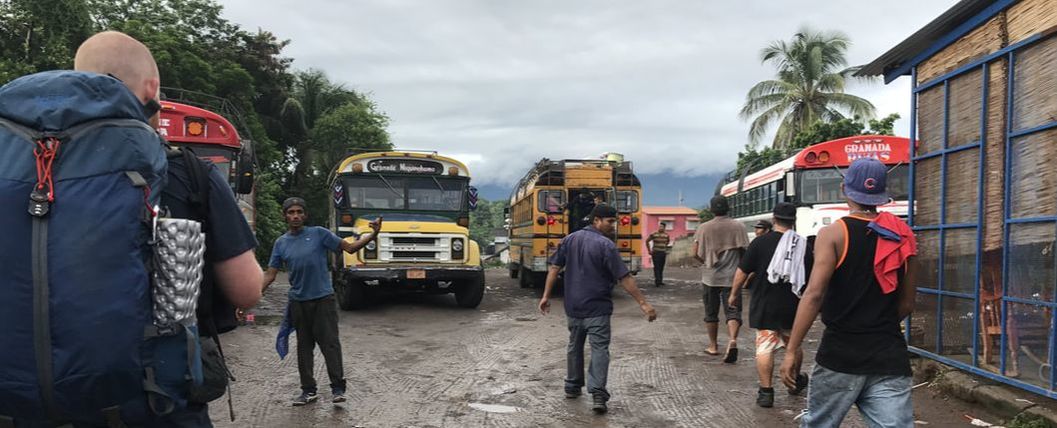 Buses and shuttles
 are the most common mode of transportation and inexpensive but can take a very long time. Here are the typical options. 1. “Chicken buses” are retired US school buses painted with neat designs, chromed out, and full the brim with people, luggage, and sometimes chickens. These buses stop regularly so progress is slow but they are very cheap like $.50 USD per hour of travel. Fares are sometimes posted but if you get on or off mid route, are negotiable. There’s typically one person on the bus in charge of money who watches for folks getting on and then gives them a price for where they want to go. They may try to take advantage of you and charge much more than is reasonable to see what they can get away with. Watch how much the locals pay to not get taken to the cleaners. Folks may try to charge you extra for large bags or for random reasons like being tall. That’s a bunch of malarkey as long as your bag fits in the overhead rack or in your lap. The language barrier can be a challenge though so keep the overall cost in perspective and pick your battles. Don’t sweat a dollar or two because you’ll be on the bus with everyone for a while! 2. “Tica buses” are traditional tour buses with AC, reclining seats, and multiple stops. These buses range in quality, comfort, and reliability and are rather inexpensive overall but some routes can be oddly expensive. Try to avoid the back of the bus since the bathroom stinks worse after each hour of travel. If those are the only seats left as was always the case for us, there is sometimes a window in the bathroom that you can open up which helps tremendously. Bathroom doors tended to not close well so give it a good slam. Also, if it rains, the back of the bus has the highest chance of leaks in the ceiling. Overall, try to board the bus at its point of origin rather than jumping on halfway through a route for a chance at a better seat. 3. “Shuttles” are large 15 passenger vans that tend to make straight shot trips from one backpacker hub to another. These range in quality as well, some with AC and movies, and tend to be the fastest since they are usually straight-shot transportation with stops only for gas and food breaks. They are more expensive at about $5 USD per hour. They tend to have great movie selections as well! We used all three types but preferred shuttles since they were more reliable and quicker and we’ve got a lot of ground to cover with a short time to do it. Booking ground transportation Booking transportation is easy and can be done at the plethora of travel agencies in towns or through the front desks at hostels. You don’t have to stay at a hostel to book transportation through them. Generally, there are only a few companies with the vehicles while the hostels and travel agencies act as the middle men to consolidate travelers onto the same shuttle, and they get a small kickback for bringing in the traveler. Sometimes you can book directly with the shuttle company for cheaper and some companies offer discounts to repeat travelers (10% discount). Be sure to ask whether you’ll have to switch vehicles or drivers along the route. Switching vehicles can add many hours to your travel time because it means you will get dumped off in a random town probably in the opposite direction from where you want to go where you’ll have to hope the next shuttle comes through to pick you up. One of our hostels did this to us and a 7 hour trip became 15 hours. If you’re going off the beaten path, this maneuver becomes more common unless you are traveling with a big enough group (4+ people) to warrant hiring a dedicated van. Regardless of vehicle, we learned the hard way that you are at the mercy of the state of roads, fickle traffic, and inefficient borders. We learned to double the estimated travel time that Google Maps gives you. Guatemala was particularly difficult because there are just not many roads so you only have a couple routes between regions. They have trouble with landslides and erosion in the mountains and I heard one route was no longer safe to travel due to highway robberies. Some roads were so bumpy that our fitbit registered the potholes as steps! Land border crossings can take 15 minutes or 4 hours. It helps to have a knowledgeable driver to get you to the right people and tell you what to expect. In Nicaragua for instance, we had to have our temperature taken, the bus sprayed down with a mystery chemical, and money exchanged with some shady guys with fanny packs. Our driver made the process much smoother than it could’ve been. Also, expect long delays for random security checkpoints and expect your driver to be pulled over for miscellaneous “fines” which happened twice on different trips for us. While on the shuttle, your butt and back will hurt. We found these handy therma-rest style foam pads to sit on which help some. It’s also rather difficult to sleep since the roads are windy and many vehicles have choppy manual transmissions. Regardless of what you try, you’ll likely need some recovery time the next day to get your legs and head back to normal. Our two best shuttle rides were with a company called Roneey. They were very fast to respond online and through Whatsapp and by far the most efficient transportation service. They wave at all the police, border agents, and friends in the towns they go through which I could tell greased the wheels a bit for how smoothly we were able to travel across countries. Flights Flights can be quite expensive in Central America. It seems like a few budget airlines dominate certain cities and routes which makes flights reasonable in cost and simplicity whereas other origin or destination points can be three times more expensive with many transfers and long layovers. Flights can save you days of bus travel and come out to a similar cost to a multi-leg vehicle trip with overnight lodging in towns along the road. They’re worth considering but require you to be flexible with origin, destination, and dates. Flights can also be a welcome, well-deserved respite from brutal bus rides. Uber/Taxi Ubers are very rare in Central America. The only city we found any was in San Jose, Costa Rica and they were cheap, reliable, and had nice cars. Overall, the cities in Central America are small so there’s not much need for ubers or taxis. Spanish urban planning was consistent in Central America’s colonial towns so you have consistent grid formats from city to city making navigation easier as well. You don’t have the same suburban sprawl as in many US cities so urban areas are dense with places to stay, eat, and be entertained. Taxis are useful when you get caught in a flash thunderstorm but prices can be all over the place. Try to get the price before setting off in the taxi otherwise you’re at the mercy of whatever the driver thinks of you since few taxis seemed to have meters. In general, it’s not as bad as online forums and hotels lead you to believe. Good ol’ fashioned walking We felt safe walking around the streets of all the Central American towns we visited. Like in the US, be conscientious of your surroundings and don’t go down dark alleys at night. You can’t text and walk in colonial towns because you will fall in a hole. Sidewalks are a patchwork of driveways, steps, and wooden planks and the mysterious holes leading to the sewer can be ankle or even waist deep. Also, signs for street names are rare. We relied heavily on Google Maps and zen navigation. Asking for directions was only somewhat successful because, particularly in Costa Rica, folks don’t want to seem like they don’t know so they sometimes make up an answer and send you on a wild goose chase. When in doubt, ask a couple of people and compare those directions. Lastly, the plentiful stray dogs seemed quite nice and somebody must watch out for them. They’re good at begging and play the poor puppy dog card well. They were even picky about the treats you snuck them! Written by: Sara There are 2 options to get from Granada to San José. You can (1) take a shuttle with Easy Ride (shuttles usually have A/C and might have movies playing as well), or (2) do it the budget traveler's way (more complicated, but can save you US$37 - US$67 per person). You'll find that there are other bus companies in Nicaragua, but they don't leave from Granada -- they all leave from Managua. (1) Shuttle with Easy Ride (2 options): US$52 - $82
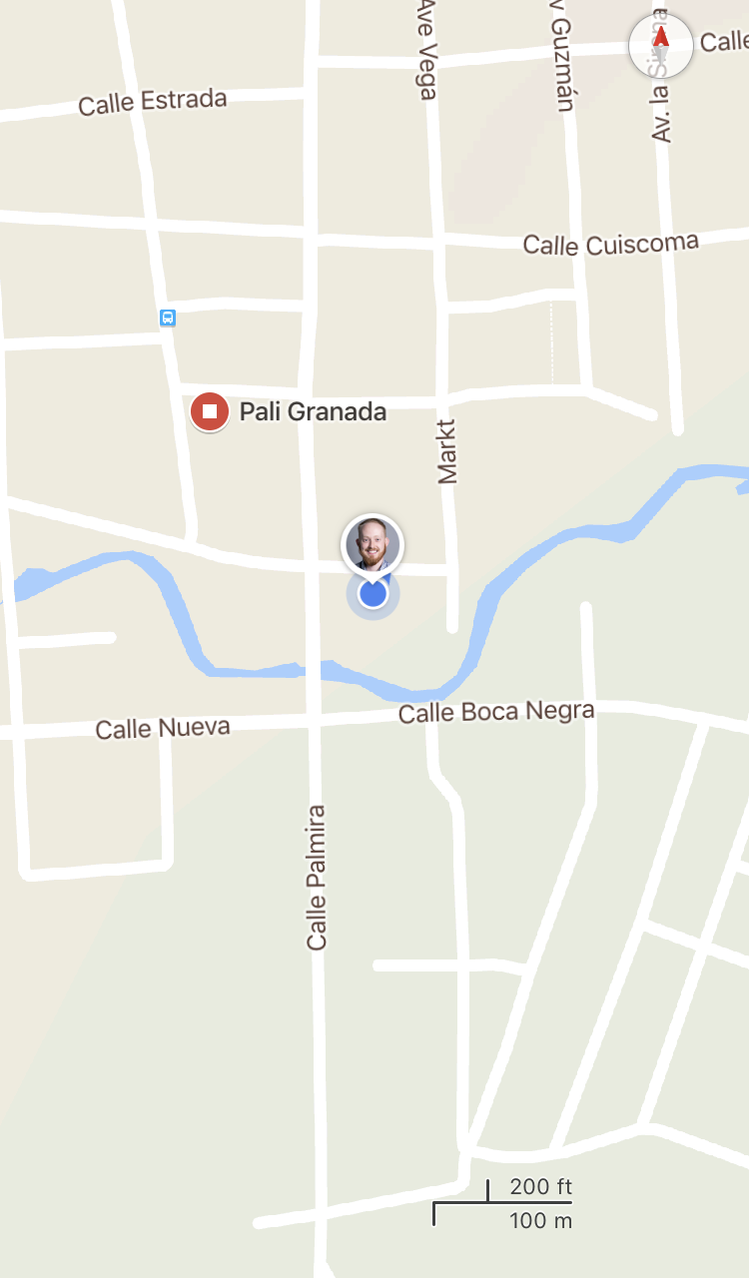
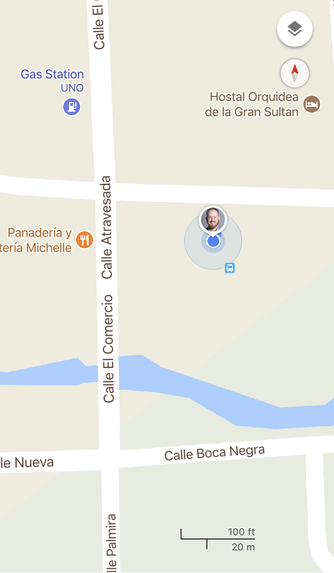
(2) Budget Traveler's Way (explained in detail below): US$15 ($12 + $3 to cross the border) If you decide to go the budget traveler's way, you'll need to take "chicken buses" to the border of Nicaragua and Costa Rica (chicken buses are old U.S. school buses that have been painted fun colors... they call them chicken buses because sometimes you will see people traveling on them with chickens and other animals), and then you continue from the border to San José on a regular bus. Here is how you do it: Step 1: Find the chicken bus in Granada to take you to Rivas It wasn't easy to find the buses that will take you from Granada to Rivas. We walked around the day before to find them, and I'm glad we did it without our backpacks on. We ended up asking someone at a nearby hostel who pointed us in the right direction. Once we got to the bus station, I could tell that there were buses at the same station that took you to other cities. However, I've also read that there are other bus stations in Granada with buses to other cities. I wanted to make sure we got to the correct one. See Exhibit A below with a map that will help you locate the bus station for buses to Rivas. You'll need to walk through the municipal market to get there, so be prepared to get your feet wet and muddy if it has rained recently. Step 2: Travel from Granada to Rivas on a chicken bus (2 hours) There are about 8 buses that leave every day from Granada to Rivas. That being said, I've seen a couple of blogs that say they don't all run every day. I highly suggest finding the bus station the day before and asking someone what the bus schedule is for the next day. They may not know the exact times though (when we asked, we were told different times), so I also suggest arriving for one of the earlier buses if possible. Our driver (who seemed to know what he was talking about at least) told us that the buses run from Granada to Rivas at the following times: 5:45 AM, 6:30 AM, 8:00 AM, 9:30 AM, 11:30 AM, 12:30 PM, 1:30 PM, and 3:10 PM. Our bus left at 8:02 AM, so be on time for the one you want! I do suspect that they may wait a little bit though if the bus isn't full yet. The bus ride wasn't too bad. It was a little hot, but since we were traveling in the morning, it wasn't too bad. The cost is C$32 (about 1 US dollar) per person (there was a sign posted in the bus with the price) + they charged us C$32 per big backpack since they each took up an entire seat (this seems like a normal practice as I've heard this from other travelers). This can be avoided if your bags fit in the overhead area. Partially through the ride, someone tried to make us put our bags in the aisle, but Colin said no since we'd already paid for seats for them (haha). We arrived 2 hours later at the bus station in Rivas at 10:00 AM. Step 3: Find the chicken bus in Rivas to take you to Peñas Blancas (the border) This isn't hard at all since the bus from Granada takes you right to the bus station in Rivas with the buses to Peñas Blancas. You will get a bunch of people coming up to you yelling "frontera!" which means border. They all want you on their bus, but keep asking around. You'll find people telling you that the soonest bus leaving is theirs in an hour, but then you'll find one leaving in 2 minutes. You'll also get people telling you that you can take a shuttle (for about US$10), but I suggest continuing on with the chicken buses since it's only 30 - 45 minutes to the border from Rivas. Step 4: Travel from Rivas to the border at Peñas Blancas on a chicken bus Like I said before, this ride is pretty short. We left around 10:05 AM and arrived at the border about 10:35 AM. On this chicken bus, I was able to fit my bags in the racks above out seats, and Colin sat with his bag in his lap. For whatever reason (probably because we are white), the man collecting money on the bus tried to charge us C$75 per person. However, I'd seen the woman in front of us hand him about C$20, so we refused to pay him that much. In the end, we paid C$25 per person. Step 5: Exit Nicaragua After the chicken bus drops you off, you'll enter the immigration office to exit Nicaragua. There is a booth on the left where you pay a US$1 (or C$30) exit tax (see Exhibit C below for a picture of the receipt they give you). Then, you walk to one of the 4 desks and pay an additional US$2 to get an exit stamp in your passport. The US$2 for the exit stamp apparently cannot be paid in Nicaraguan córdobas. We had USD to pay with, but I am unsure of the legitimate rules on this. There are people to exchange money with, so if you don't have USD, I believe you can get it with them. Step 6 / 7: Get a "normal" bus to travel from Peñas Blancas to San José This can either be done before or after you enter Costa Rica (see below). We did this as step 6. There are a few buses that are at the border already with other passengers. These are the "normal" buses like Tica or NicaExpress. They are air conditioned and have movies playing for the ride (although sometimes all in Spanish). They each cost US$10 (you can also pay in Nicaraguan córdobas or Costa Rican colónes). Notes on this: there are already passengers on these buses, and you will only get the seats that no one else wanted. Our seats happened to be together (which is not always the case), but they were at the very back where you not only feel every bump, but it also smells like shit for the entire ride because it's right next to the bathroom. We also exchanged all of our leftover Nicaraguan córdobas at this point for Costa Rican colónes. Step 6 / 7: Enter Costa Rica This can either be done before or after you get a "normal" bus from Peñas Blancas to San José (see above). We did this as step 7. Someone somewhere will hand you 2 forms to fill out for immigration and customs into Costa Rica. Our bus driver handed them to us, but you can also get them somewhere inside the office. You stand in line to get your passport stamped for entry to Costa Rica (which was free, but there is a departure tax that you will have to pay). Important note: Sometimes, the immigration officer will ask you for proof of onward travel out of Costa Rica. We had plane tickets to Colombia, and we showed them the confirmation on our phone. After immigration is customs: you put your bags through a scanner and enter into Costa Rica! If you choose to do so, you can walk over the border into Costa Rica instead of taking a bus across. I'm not sure the benefits of doing this since we didn't do it, but if you don't find a bus on the Nicaraguan side, do not fear! There are several booths on the Costa Rican side that will help you get a bus to where you are going. Steps 5 through 7 took almost 2 hours. I don't think this is normal, but be prepared that it can take this long (or possibly longer I'd guess). We left the border at 12:20 PM (remember we arrived at 10:35 AM). Step 8: Arrive in San José There was traffic on our way; plus, our bus stopped at the airport on our way to the city center. We arrived at the bus stop in the city center around 7:00 PM. It was a long day with nearly 13 hours of travel, but I think that usually it does not take this long. You never know though with traffic! I will point out that the chicken buses did not add time to our journey. I believe that if we had taken a bus from Granada to San José, it would have taken the same amount of time since what added the most time was border crossing and traffic. Exhibit A: Map to find the chicken bus in Granada that will take you to Rivas Colin's head is the location where you find the bus station for buses to Rivas. Picture on the left is zoomed out, and picture on the right is pretty zoomed in.
Exhibit B: Pictures of chicken buses 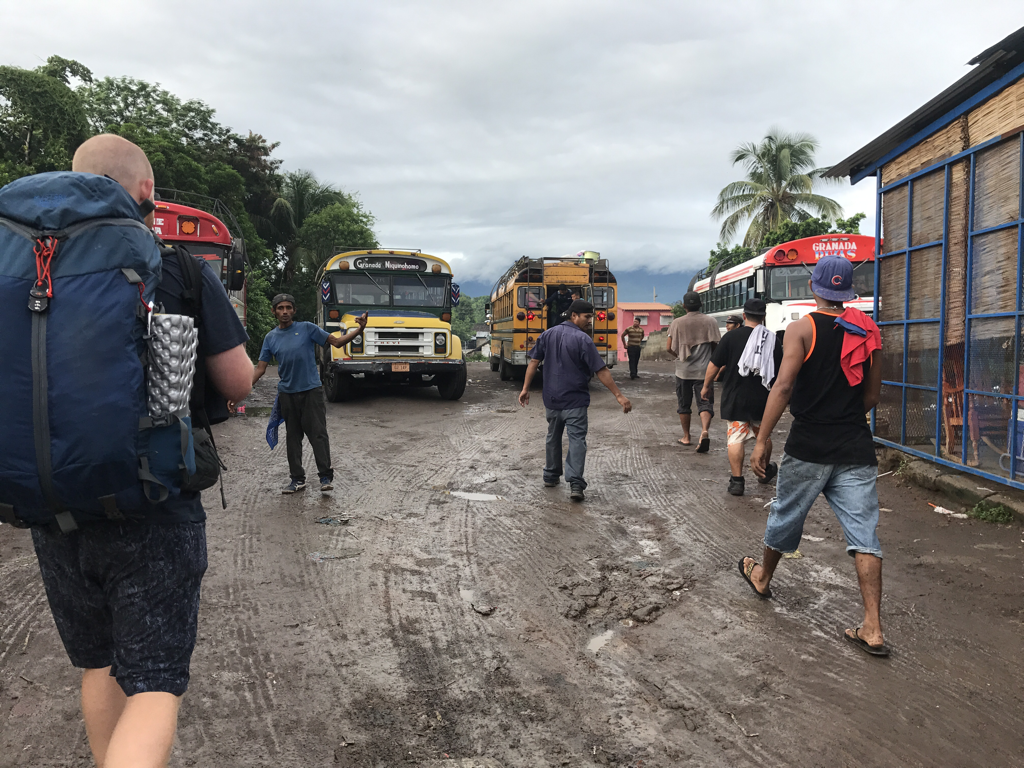 Arriving at the bus station in Granada, Nicaragua 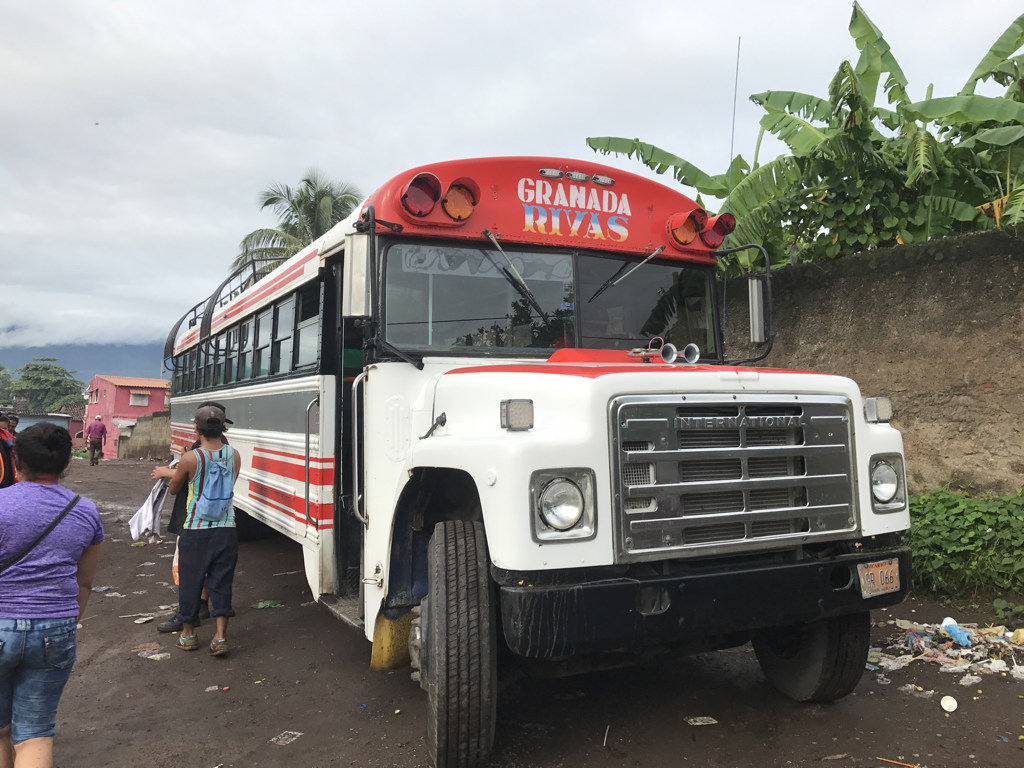 Bus from Granada to Rivas 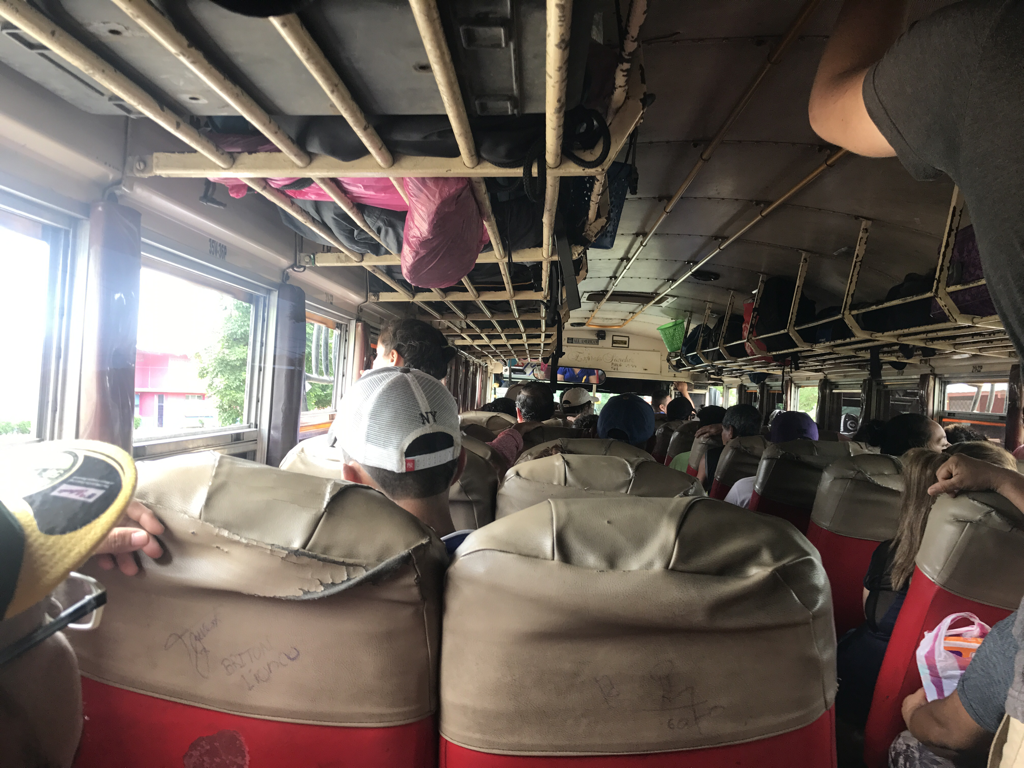 Inside the chicken bus Exhibit C: Receipt you'll get for the $1 you pay to exit Nicaragua 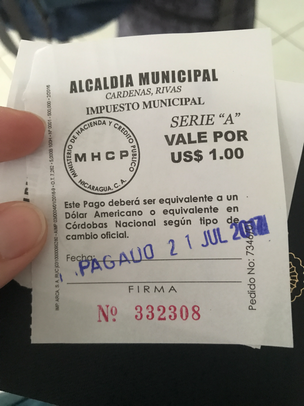 Written by: Sara I got this question pretty often before we left, and it's something I asked (and still ask) myself often as well. Colin and I read several blogs about what to pack, and I even have an entire Pinterest board dedicated to packing for travel (never used Pinterest for travel suggestions? Rethink your whole life!) When I backpacked in college, I didn't have any nice gear or special hiking clothes. I got my first travel backpack for my trip to Tanzania in 2010 on eBay for $30, and I continued to use it for the next 7 years. It was great, but definitely a $30 eBay backpack. Since this trip was for much longer, I wanted to do more research and spend a little more money on gear in the beginning to (hopefully) be more comfortable in the long run. To me, packing is a personal decision. The big question is what can you live without? It's different for everyone, so I can really only give you suggestions and tell you what we did. Hopefully it will help :) Also remember though that we are traveling for 21 months on this trip, and we need clothes and gear for both warm weather and cold weather. You can pack way less if you only need items for one or the other. The two most important things when choosing what to pack:
Sometimes when I meet other backpackers, it seems as though it's a competition -- who can travel with the least amount of stuff? Sometimes I catch myself getting drawn into the competition too. The truth is, in the "real" world when I'm not traveling, I'm a little high maintenance. I loved getting my nails done every 2 weeks. I loved buying new Lululemon. I loved expensive coffee after my barre or spin workout at my gym. But when I'm traveling, simplicity is key. I'm trying to find a balance between cost, comfort, and cuteness. Sometimes I have the least amount of stuff in a group, and sometimes I have the most. I'm learning to live and let live :) Ok, so let's jump into the details! Sections below are: 1) Sara's Stuff, 2) Colin's Stuff, 3) Gear & Electronics, and 4) Stuff we use to pack it all up (backpacks, packing cubes, etc.). 1) Sara's Stuff: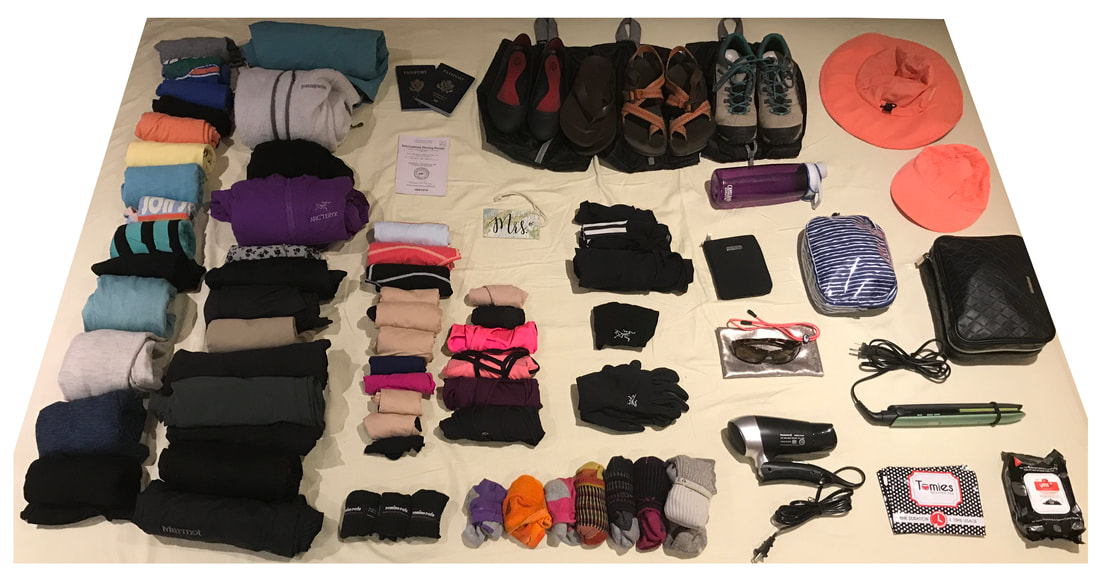
The blue and white toiletry bag is for all of my shower supplies: 
The big black Sephora toiletry bag is for all of my personal toiletries: 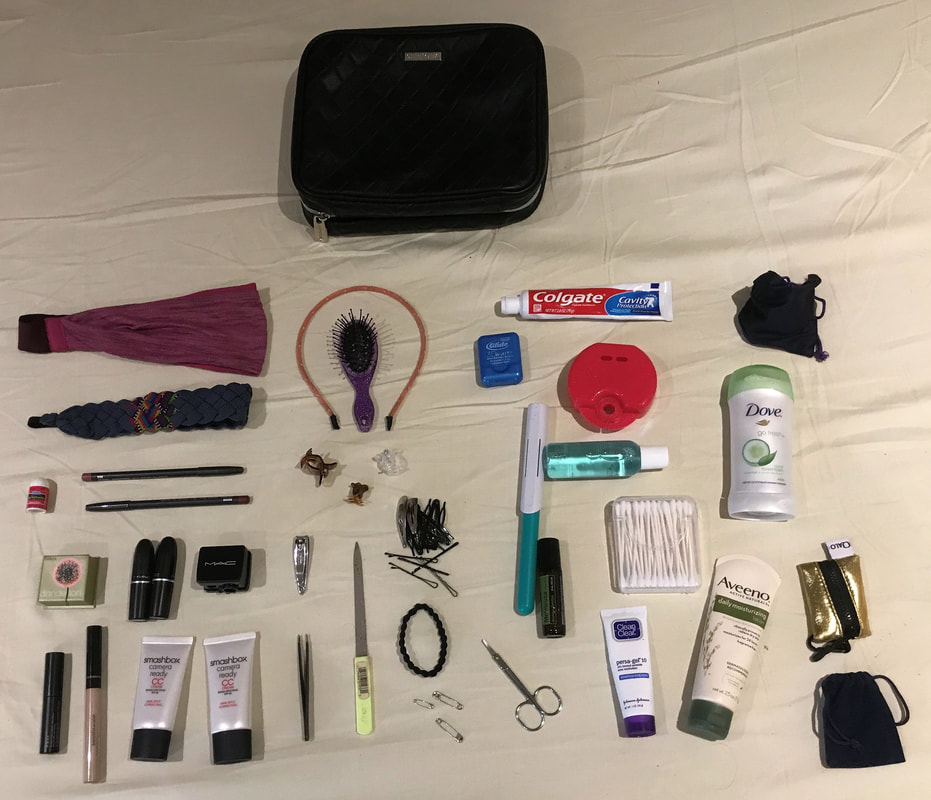
2) Colin's Stuff: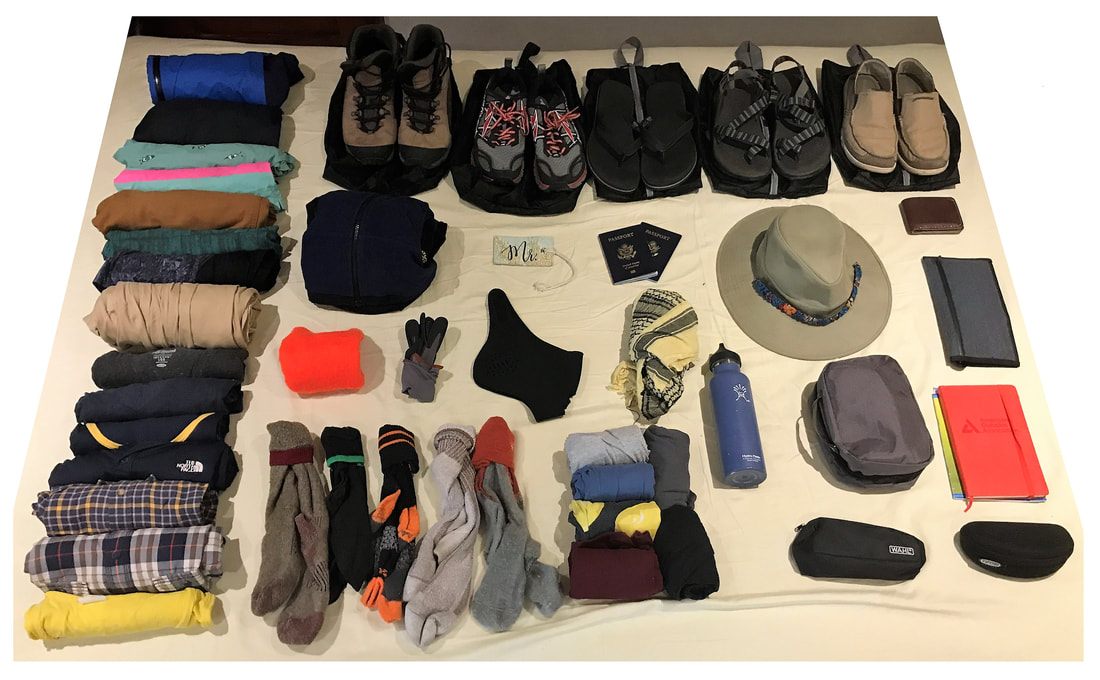
3) Gear & Electronics: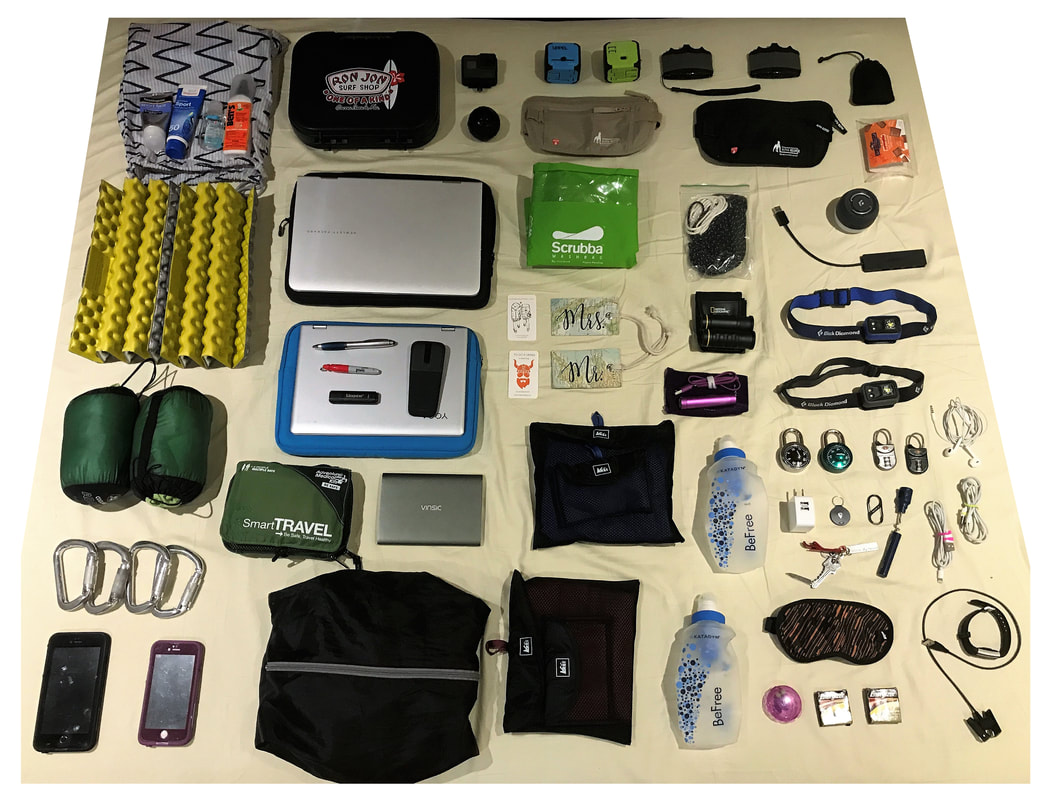
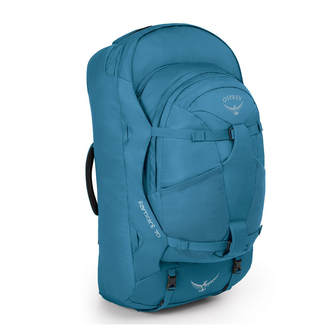
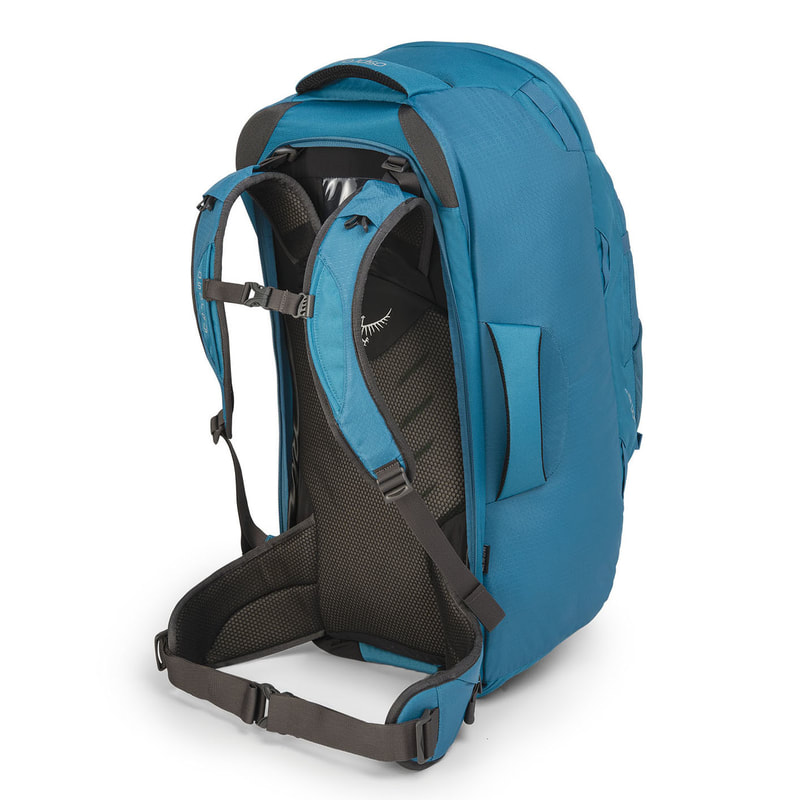
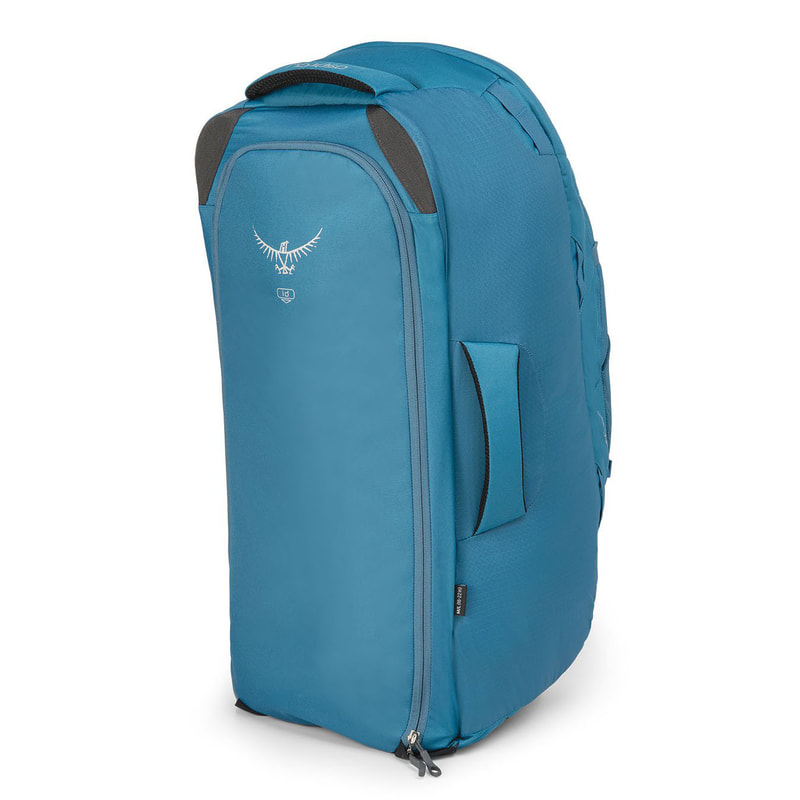
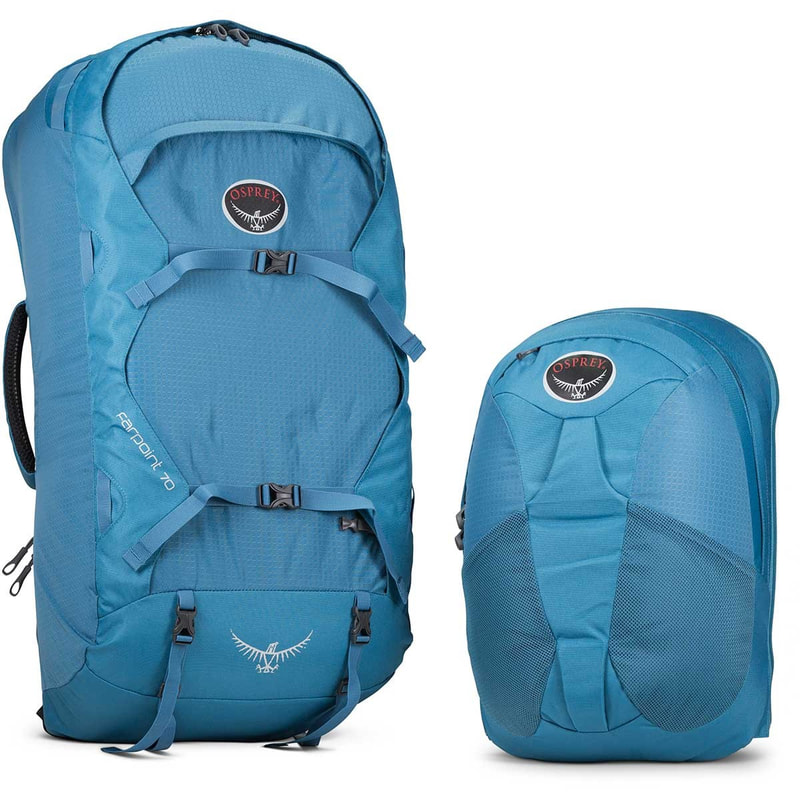
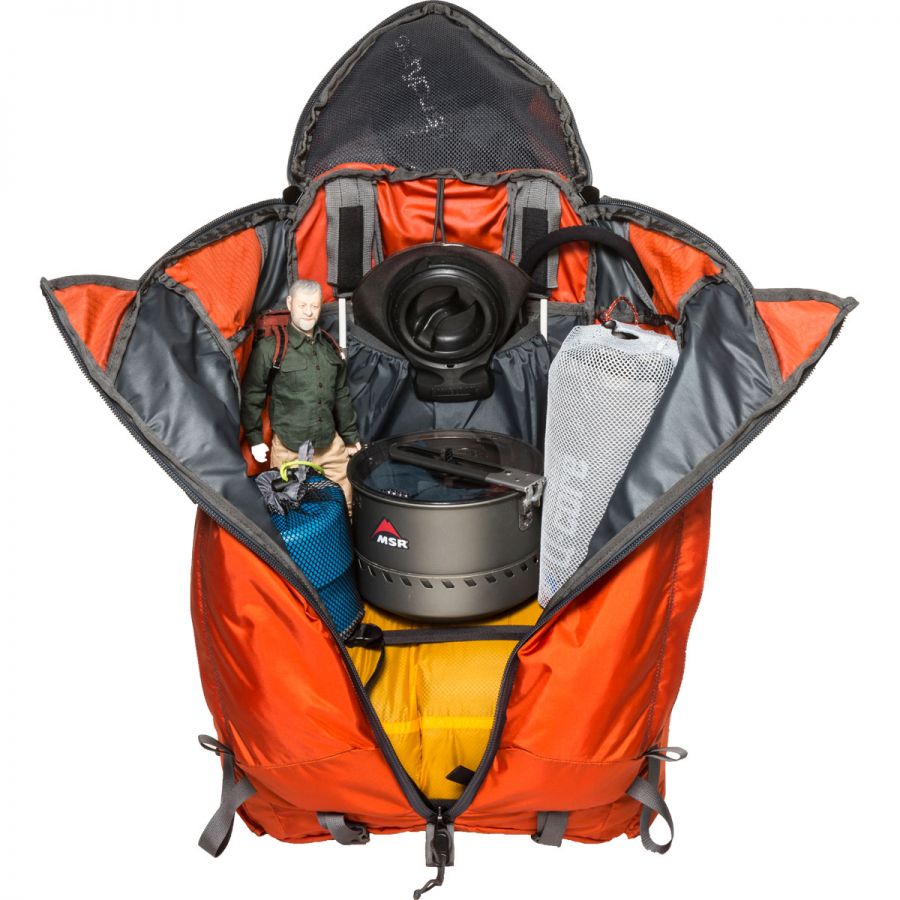
4) Stuff we use to pack it all up:On a travel day, I have 3 bags: My big backpack, my little backpack, and my purse. Colin has his big backpack, his little backpack, and his hat (since he doesn't want it to get crushed). It's a lot to carry, but it's doable. Here's what we look like walking around the airport: 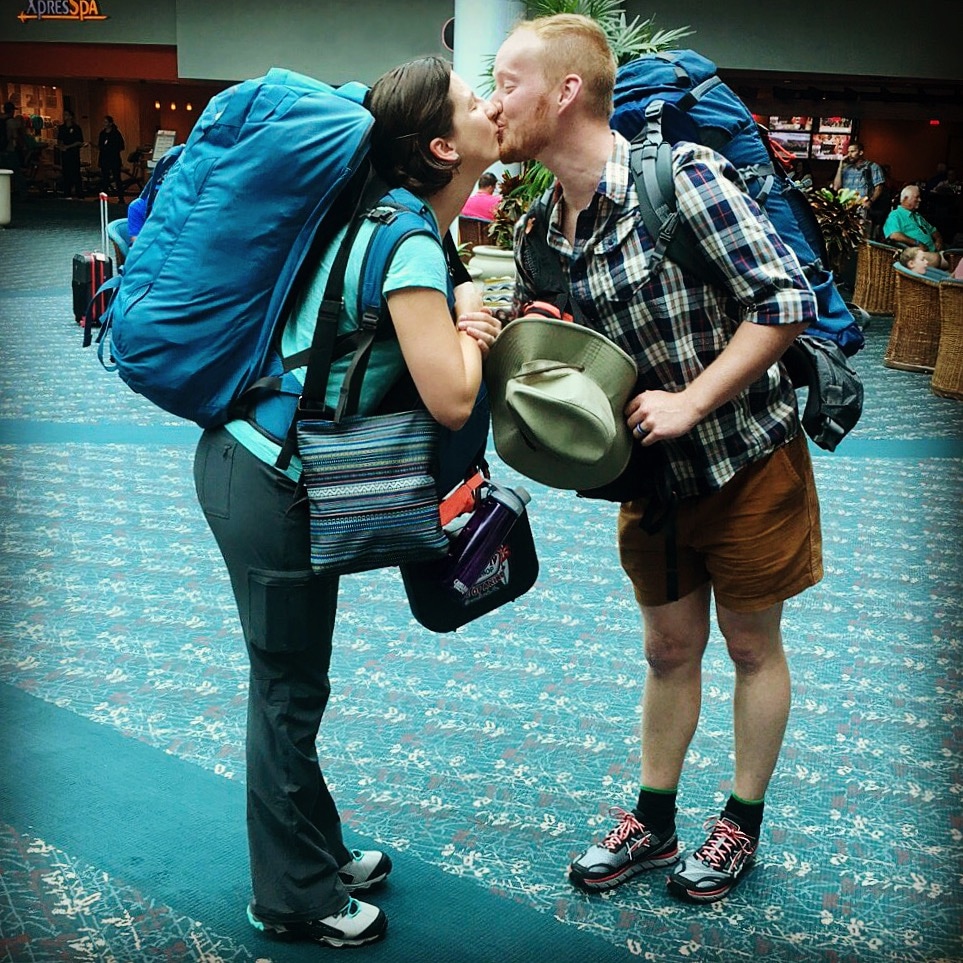 Big Backpack - Hers: Osprey Farpoint 70L
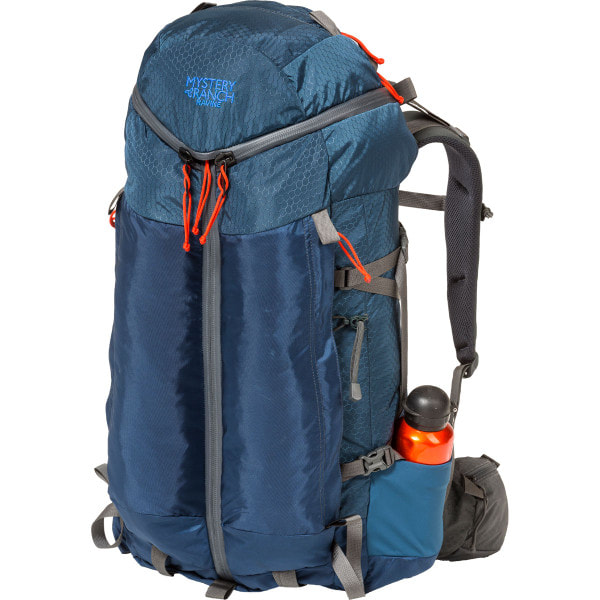
Big Backpack - His: Mystery Ranch Ravine 50L
Organizing Your Stuff Let's talk in general about organizers. They are life changing! I have never traveled with them before, but they are amazing. What do you need and why?
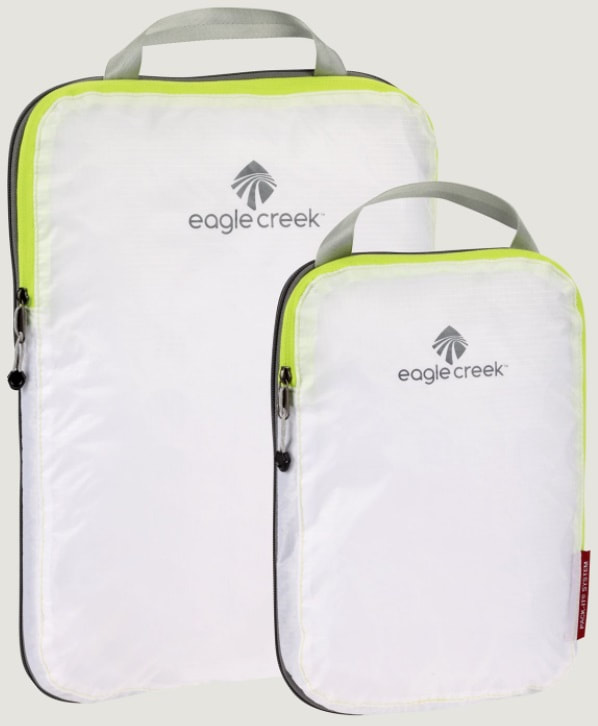
Below are some links and info on everything we use. Eagle Creek Pack-It Specter™ Compression Cube Set (S/M)
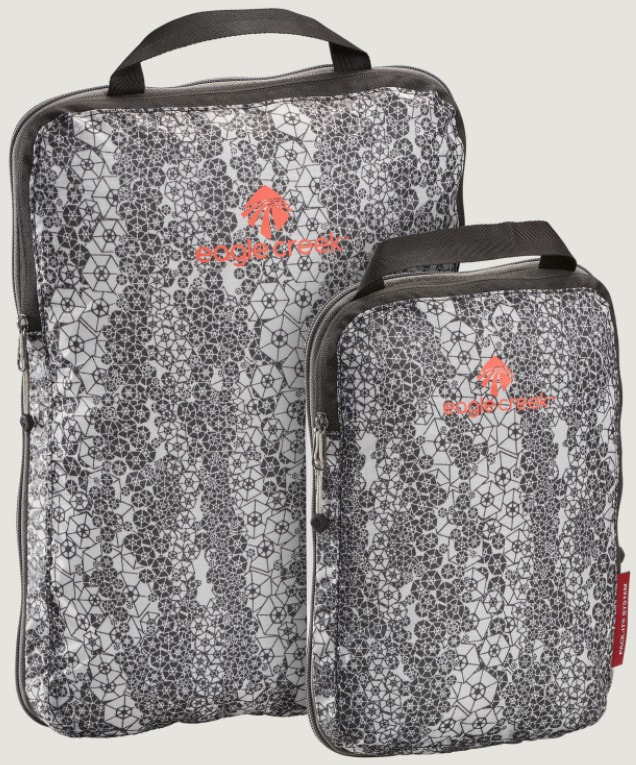
Eagle Creek Pack-It™ Compression Sac Set S/M/L
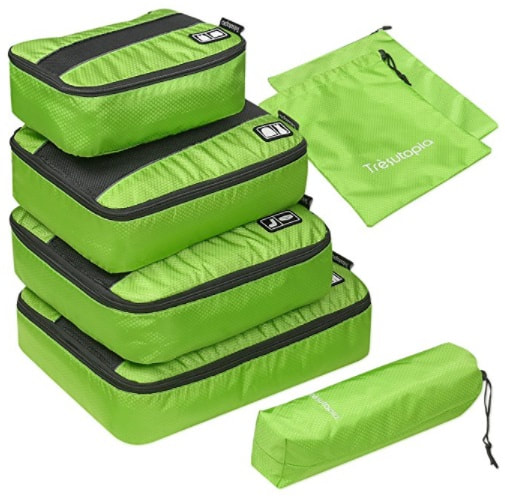
6 Piece Tresutopia Waterproof Luggage Organizer Set
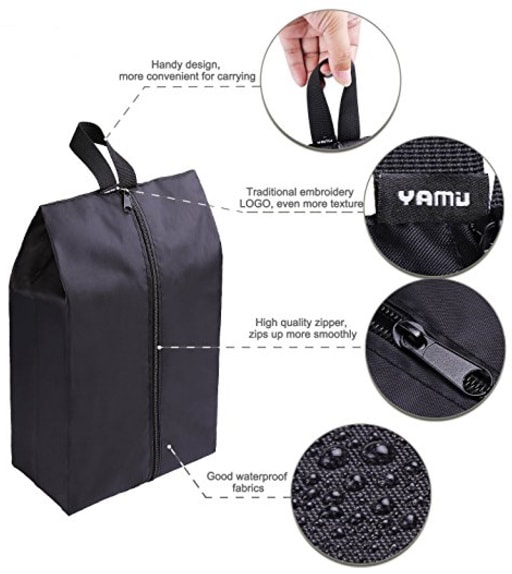
YAMIU Travel Shoe Bags
Here's what my clothes look like when they are all packed up:  I've said it before, but these are all merely suggestions. You do you when it comes to packing :)
Comment below with any questions or other suggestions!   Written by: Colin
I spent 3 full days shopping around for travel insurance ruining my recent lasik by pouring through countless pages of fine print. I had at least 50 tabs open to try to compare information but ultimately turned to good ol’ fashioned paper and pencil and cold calling the companies. In this post, I’ll cover how we chose our insurance, what level of coverage we chose, and pitfalls that I’d love for you to avoid. A strong word of advice is to become extremely familiar with the fine print of the plan you end up choosing because if you do not follow their terms and conditions perfectly, you will be left with the fat bill. Spoiler We ended up purchasing 2 different plans. For travel medical insurance, we chose IMG’s Patriot International plan with a $500k limit, $0 deductible, and the Adventure Sports package add on. For personal property insurance, we chose USAA’s tailored renter’s insurance. A brief case for purchasing travel insurance I’ll be a bit harsh and say you are dumb not to purchase travel insurance. With all the time, effort, and money you’ve poured into orchestrating an extensive trip, an injury, sickness, or the loss of your gear can easily kill everything. For about $125 per month, we’re both fully covered for any big problems on our trip. Bottom line, this should be considered a required cost for extended travel. Determining the type of coverage you need There is a sea of companies offering a dizzying number of insurance types. The devil is certainly in the detail and unfortunately, I did not find any comparison site that adequately compared options or offered unbiased critiques. Here are some factors to decide to help narrow down the field. Duration of coverage is a key factor and can be broken into short term (<1 month), mid length (<6 months), and long term (6+ months). Some plans are geared towards the big spending short term traveler and the plan’s benefits are sweeter and best for a strict schedule traveler with a lot of prepaid, upfront expenses. The mid length traveler plans scale back some benefits and assume the traveler has a bit more flexibility in their schedule. Long term plans assume even greater flexibility in a traveler’s schedule and offer plans that can be purchased to cover 12 months at a time. Many companies target certain segments only so for a long term trip like ours, their plans were either astronomically expensive or only available for 2 to 3 months at a time. I certainly did not want to have to buy new coverage every 2 months. The second major factor to consider is whether you need trip cancellation coverage. This means that if you have paid for a good chunk of the trip before going and some unforeseen problem arises that causes you to cancel the trip, those prepaid, non-refundable expenses will be reimbursed. This coverage is quite expensive and significantly drives up the overall cost. For Sara and me, we want to be flexible and aren’t in a rush, so we do not book much in advance and if we had to cancel something, we wouldn’t lose much. Top of the line Cadillac insurance plans typically include trip cancellation insurance but your overall cost can double and even triple. The next factor to consider is the total coverage and deductible. Emergency evacuation, long term hospitalization, or extended illnesses can get extremely costly. I read many articles on the topic and the consensus is that travelers should have a minimum of $100k total coverage out of their travel insurance. In the plan we ultimately chose, the most advantageous price point was to increase our cost by $8 per month to increase our total coverage to $500k each. Deductibles also have a dramatic effect on overall cost and typically range from $0 to $2,500. Plans with $0 deductibles were about twice the total cost of plans with $2,500 deductibles but filing one claim would be almost 4 times the cost of the insurance itself. Unfortunately, few companies give you the ability to choose different coverage levels and deductibles, therefore requiring you to shop around a lot between companies. Lastly, I wanted insurance that would cover Sara and me in adventure sports like diving, mountain biking, spelunking, parasailing, skiing, etc. These sports come with more risk so many companies do not want to get into this market. This requirement significantly narrowed down our list of options. Comparing companies and plans There is no easy way to compare insurance companies and their plans. In addition, the water is muddied by biased reviews and guerrilla marketing. One company in particular, World Nomads, appears to sponsor many travel bloggers to write glowing reviews of their service. Oddly, the only positive reviews were in syrupy sweet posts on travel blogs that also had blatant advertising banners for World Nomads. Outside of these high profile blogs, every other public review source had nightmarish reviews of the company’s poor performance and service. However, reviews must be taken with a grain of salt because there’s not much impetus to write positive reviews online and the insurance industry operates on the slim chances that the insurance will ever be needed. As a result, most customers pay for the insurance but never use it. The small percentage of folks who do use it have bigger concerns than posting a review of the service online. Generally, the reason you’d post a review is if you had a poor experience and the worse the experience, the more likely you are to post a review. Positive reviews are rare but to me, hold more weight. World Nomads has a slick website and easy interface, is endorsed by Lonely Planet and National Geographic, and underwritten by Nationwide Insurance. I thought they’d be the easy choice until I started to dig through online reviews. The horror stories in these forums scared me. As a result, I entered this pattern where I’d read terrible reviews about World Nomads then turn to the headache inducing task of trolling other insurance companies’ websites, give up after making no progress, return to World Nomads and find a new forum of even worse reviews, then troll through more confusing websites and fine print to compare other companies. I completed this cycle 5 or 6 times until I finally picked up the phone to go over coverage options line by line. Note that there are plans and great addons that aren’t listed online. By this time, I’d tossed out World Nomads as a brilliant advertising company but terrible insurance company. After calling a few, IMG came out on top by meeting all our essential criteria and allowing customers to choose coverage limits and deductible amounts. However, the hang up was that their plan didn’t cover any personal property from theft and had far too low of reimbursements for lost luggage. Our life is in our packs so losing these puts a big dent in our travel plans. At this point, I began researching personal property insurance. Many companies shy away from insuring electronics since they are prime targets for theft and easily damaged. It was easy to find companies willing to insure our stinky clothes and dirty packs but insurance for electronics was rare and expensive. Luckily, we’d already bought accidental damage insurance for our major electronic items so renter’s insurance was a great option since it covers theft but not accidental damage for all items we’re traveling with. My easiest option for renter’s insurance was to stick with USAA which I’ve been happy with for the past 6 years. As a result, with IMG covering our travel medical needs, and USAA covering our items, I sincerely hope our bases are covered. I also hope to never have to use either plan but if we do, I’ll update everyone on how each company performs and post a review online... Written by: Colin
Be free. Go minimalist. Whatever your mantra, parting with your home goods can be invigorating and frustrating. Our goal was to avoid needing to rent a storage unit for two years while we travelled and it was a good opportunity to simplify and reset furniture and wardrobe-wise. We used Craigslist, Ebay, and our friend network to sell most of our furniture and electronics. The rest we gave away or donated. Craigslist for Furniture Surprisingly, the IKEA furniture was the quickest to sell. Within 2 days of posting on Craigslist, nearly all the IKEA was gone. Big ticket items were slower to move, and Craigslist was not an effective platform for higher end items. $200 was the inflection point for furniture on Craigslist. Furniture under $200 sold within a few days but we had to field a lot of silly questions for information already listed in the posting and persevere through a lot of spam and scam attempts. Our advice for Craigslist posts is to list out all applicable information about the item in bullet format. Avoid hollow superlatives like awesome, perfect, gorgeous and do not overuse capitalization or punctuation. Convey the information clearly and concisely but include a little personalization so your post doesn’t seem computer generated. Regarding scams, by adhering to cash or Venmo only and in person transactions, you’ll avoid the common ones. If a story or request seems fishy or too good to be true, it is, and don’t waste your time or expose any information. You’ll get some odd stories and requests to mail items or be paid with certified checks. These are scams and the typos make them even more sketchy. If the person isn’t willing to meet in person, it’s not worth your time. Also, though it’s not common, watch for counterfeit cash. We didn’t have a problem with this, but there are fake bills floating around. Overall, Craigslist is really not as sketchy as the internet hypes it up to be. We sold the bulk of our items on Craigslist and met a lot of interesting people who genuinely just wanted decent used furniture. It’s an effective platform but requires some maintenance and patience for communication. In the end, if you still have things to get rid of but can’t donate, listing these for free on Craigslist will make your phone melt with texts and calls. This is a good option over hiring someone for junk removal. Build a website Selling through friend networks was the better option for higher end furniture. We built a website for free through Weebly and posted links to Facebook so that it was easy to browse through what we had left. This generated consistent and reliable interest on higher end pieces of furniture and we kept some of our favorite pieces within friend networks so we know they went to good homes! Out of consideration for folks, keep this updated with what’s already sold so that you don’t waste folks’ time asking about items that were no longer available. Donating and giving away Habitat for Humanity is a great option for furniture while Goodwill will take your extra clothing and assorted home wares. Make sure to get receipts from these folks to back up the donations on your taxes if you itemize. It’s a good feeling to donate these items and a lot easier than haggling with individual buyers but be wary of the financial tradeoff as well. For tax purposes, items are generally valued on a generic scale so if you haven’t been able to sell an item for at least the value you’d get on your tax return, you’re better off financially to donate the item. We had a lot of fun parting with our clothes and knick-knacks we’d collected over the years by throwing a “house-cooling” party. On our last day, we set out everything we’d planned to donate in flea market style and invited friends over to take whatever they wanted. We handed out shopping bags and koozies at the door and anything in sight was up for grabs. We loved seeing how excited folks got finding some of our treasures and were glad to pass along the enjoyment to our friends. Craigslist for Cars We successfully sold a car on Craigslist! This type of transaction is much more serious than cash transactions for furniture and should be treated accordingly. Do your research online for methods, procedures, paperwork, and potential buyers. Kelley Blue Book (KBB) is a great place to start to give you a ballpark value for your vehicle if selling to a dealer or private party. We got a quote from a Mazda dealer and they did a terrible job. They had the wrong engine size and specs and gave a silly low quote as a result. KBB got us closer since we entered the specs ourselves. The caveat though was the after-market improvements to the vehicle aren’t handled well by KBB. By comparing to other similar cars, we were able to get a solid price estimate building off the KBB quote. The beauty of Craigslist is that it opens up a much larger market for the sale of your vehicle. It ended up that there was a buyer a state away looking for the exact color, model, engine, and after-market improvements that we had to offer. As a result, the transaction was swift and clean. Check your specific state’s requirements for private vehicle sales. You may have to take a trip to the title and tag office to get a lien-free title and close your vehicle registration. Plan ahead and allow ample time for the government so that this isn’t the bottleneck for the transaction. Also, do your research on the buyer. It’s very easy to dig up folks on Facebook, LinkedIn, etc. By the time the guy came to buy the car, we already knew what school he went to and who his parents were in case something didn’t work out the way it should’ve. Our last word of advice is to complete the transaction during bank business hours so that you can call the person’s bank to verify that the certified check is valid and there are sufficient funds to complete the transaction.  Written by: Sara
Couchsurfing.com is a website dedicated to connecting travelers from all over the world. I explain it to people who have never heard of it by saying "it's like Airbnb, but it's free." The truth is though, it's so much more. It really connects you with the person / people you're staying with. I've met some nice people who have stayed at our place through Airbnb, but I can't really remember any of them, and I've never hung out with any of them. I can remember my first time with Couchsurfing hosts though. It was with 6 people from different countries that were living together in a flat in Amman, Jordan. They took my friend and I to a karaoke bar where we didn't sing, but then we went back to their place and sang karaoke songs from YouTube all night long. And they had a kitten they'd adopted that liked to chase highlighters. I was hooked. When I returned from that trip and got my own place in Atlanta, I started hosting. I met the most interesting people who crashed on my couch and a spare air mattress in my living room. And when Colin and I moved in together, we had our own spare room and spare bathroom where we could host more comfortably. We got so many requests that I couldn't keep up with them! The key to Couchsurfing is that no one wants you if you are just looking for a free place to stay. That is NOT what it's about. Couchsurfing is a community of travelers that want to help you out, but also want to meet you and learn from you and exchange stories. When you send a request to stay with someone, you have to personalize it. It is time consuming -- you need to read through the person's profile, see if you want to stay with them, and then tell them why you want to stay with them. You can't look at a map and pick the part of town you want to stay in. You have to dig through profiles to see where they say they're close to in order to determine if that's the part of town you want to stay in. And soooo many people never even respond to your request, so you have to send multiple for the same city and hope that someone responds. For reference, our Couchsurfing profiles: https://www.couchsurfing.com/people/cmccrory31 https://www.couchsurfing.com/people/saramonica316 |
Sara & ColinWe are figuring out our travel as we go along, and we'd love to help you out with yours! If you want to read more of our travel thoughts, check out each of our personal blogs by clicking the images below. Archives
August 2017
Categories
All
|
McPatton Manual - DNU

 RSS Feed
